In general I try to keep the installation on Mac OSx as simple as possible. And in general it's no more difficult compared to Windows. However some things might not be easy at the first time, so here comes an installation with screenshots for each step (mind I personally don't have a mac, so I took the screenshots from a remote computer running OS X 10.6.8 (Snow Leopard) and Basecamp v. 4.0.4.
This is a guide for Dummies, so it is quite long. You will actually find all of this very easy I hope and keep in mind, this guide is written for people who never used Garmin format maps on their Mac. If you have experience with other maps, You will only need to read through Step 1, Step 2 and Step 5. However you might find the general information at the end useful too.
The screenshots in this guide show installing an OpenMTBMap. For the VeloMaps it is identical - the folder is simply called veloCOUNTRY instead of mtbCOUNTRY - i.e. velotaiwan_macosx.7z
Prerequisites:
So as a prerequisite get the newest version of Garmin Basecamp from here - https://www8.garmin.com/support/download_details.jsp?id=4449
This should include, Garmin MapManager for Mac, and Garmin MapInstall for Mac. We need all three programs installed to continue...
If they are not included in Basecamp download (seems to be the case lately) - get them from here: http://www8.garmin.com/support/download_details.jsp?id=3825
If I talk about right-click, I mean secondary click. If you don't know how to do that on your Mac, google it up - you miss out on many features without it in general. In general it is done by CTRL & Click if your mouse has no right click button.
Mac OSx running on new M1/M2 (or newer) chips / Catalina or newer:
You need to Install Android File Transfer so MapInstall can see your device:
https://www.android.com/filetransfer/
Also see here: https://support.garmin.com/en-US/?faq=ufgaLgXyiX2eSZfAsQhdu7&searchQuery=not%20recognized%20catalina
1. Step - Download - then Unarchive Maps:
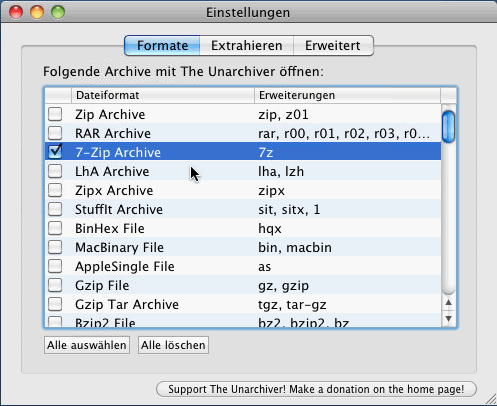
You will need The Unarchiver (or any other unarchive program with support for lzma2 !) to unarchive your downloaded maps, Get The unarchiver here: https://theunarchiver.com
During the setup, the settings page should popup, tick: "7-zip Archvie" - as shown below.
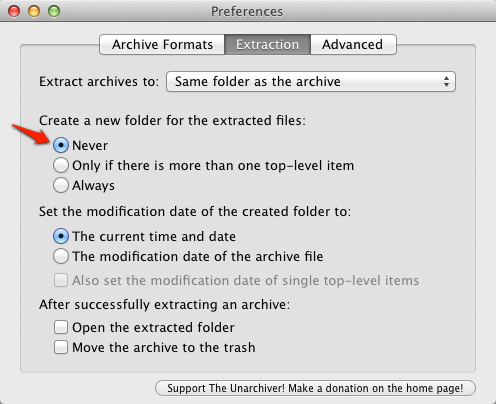
during install, also make sure that under "Extract archives to: Same folder as the archive" ---> Create a new folder for the extracted files:
either "Never" or "Only if there is more than one top-level item" is selected.
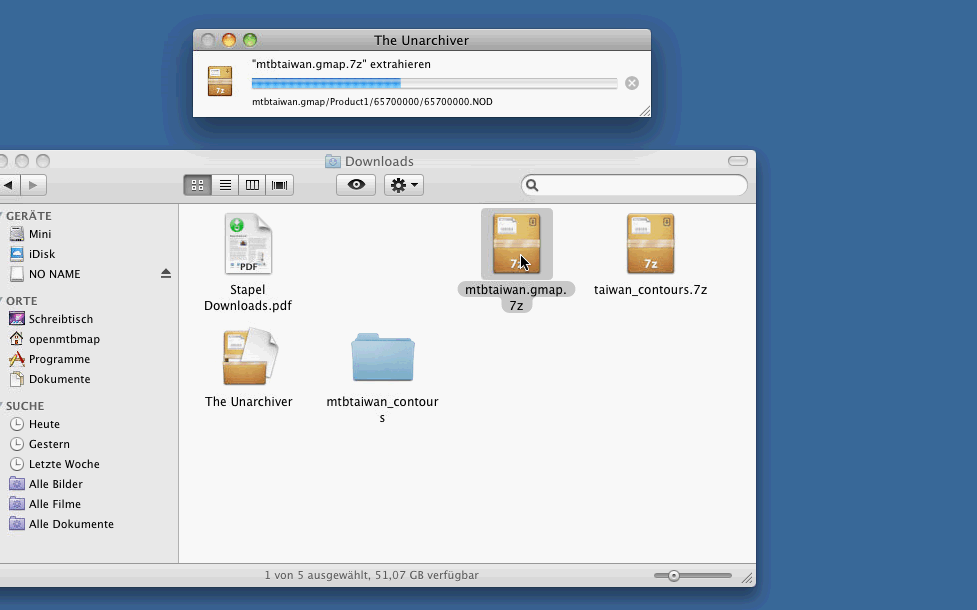
Then just doubleclick on the mtbCOUNTRY_macosx.7z (in this example mtbtawain_macosx.7z). It will be extracted as mtbtaiwan.gmapi (in case of problems it is good to know - inside the mtbCOUNTRY.gmapi you will find the mtbCOUNTRY.gmap)
2. Step - Install the map:
Double Click on the unarchived download. It is called mtbCOUNTRY.gmapi (COUNTRY standing for the country you downloaded).
Note on newer Mac OSx version doubleclick may not open MapManager - use right click instead - then select "open with Garmin MapManager".

Now you will see MapManager pop up. Click on the blue button to continue. You will see the mapname again
Usually, but not always, once installed MapManager will popup - here you can see the full name of the map (in this case openmtbmap_taiwan_11.01.2013) and on the right site the place where it is installed to - this place is /Users/YOUR_USERNAME/Library/Application Support/Garmin/Maps/mtbtaiwan (taiwan in our example, germany would be mtbgermany, and so on). If we click on an entry, and then rightclick, we could uninstall a map from here. Also we can open the installation directory for any map from here - which is very useful and needed later on.
If it doesn't pop up, installation should have been successful too. Here you can see all your installed maps, and if you want to remove a map, open MapManager, right click on the map, and Remove/Uninstall it.
In case of Problems:
If on clicking on mtbCOUNTRY.gmapi (COUNTRY is a placeholder here for the name of the country - e.g. Germany or Taiwan) the package is opened in Finder (or your File explorer) - instead of MapManager popping up here is what to do:
First Try: Open Garmin MapManager, and find the mtbCOUNTRY.gmap folder you want to install (the mtbCOUNTRY.gmap folder is inside the mtbCOUNTRY.gmapi folder) - and open it from within Garmin MapManager! (see Prerequisites about Garmin MapManager installation)
Second Try: If installation from within Garmin MapManager should fail too (I don't know why it would) - you can move mtbCOUNTRY.gmap (the mtbCOUNTRY.gmap folder is inside the mtbCOUNTRY.gmapi folder) into the following folder: /Users/YOUR_USERNAME/Library/Application Support/Garmin/Maps/
Note you need to move the gmap folder which is inside the gmapi folder - not the gmapi folder. Since I took those screenshots I adapted the map format (as garmin did so too) from mtbCOUNTRY.gmap to mtbCOUNTRY.gmapi/mtbCOUNTRY.gmap as in some cases this would solve the problem of Garmin MapInstaller not opening.
Alternatively you can install the mtbCOUNTRY.gmap to: /Library/Application Support/Garmin/Maps/ (top level - not inside your user folder). Both Locations are perfectly fine - but best only use one of them for all of your maps. If you have the same country map in both locations - you are asking for trouble.
(also see the map manager Screenshot above - actually MapManager does nothing else than move the .gmap package (folder) for you - once it is placed there - it will be found by Basecamp).
Delete Basecamp Cache
If you open the map before it's fully installed - Basecamp may cache an empty map:
to delete cache – clear:
~/Library/Caches/com.garmin.BaseCamp/TileCache
~ being your home folder.
You can do this from Terminal using the command /bin/rm -r ~/Library/Caches/com.garmin.BaseCamp/TileCache/*
it's also possible that the Tilecache is located here - so use:
/bin/rm -r ~/Library/Containers/com.garmin.BaseCamp/Data/Library/Caches/com.garmin.BaseCamp/TileCache
or here - use:
/bin/rm -r ~/Library/Containers/BaseCamp/Data/Library/Caches/com.garmin.BaseCamp/TileCache
3. Step: Use the map with Garmin Basecamp for Mac
When you startup Garmin Basecamp for Mac, it will show you the last installed map (or the map you last used Basecamp with). In our case - this is the map of Taiwan. Now you can zoom in and work with the map just like any other map. If it's your first time, best play around a bit and read the manual if you're unsure.
All maps support autorouting - I recommend you to use the "routing-function". It's the easiest and quickest way to create routes.
I recommend to set the profile to "Car" (German Auto) or "Bicycling" for best results - Read through here for understanding how the Openmtbmap works with Autorouting and which avoidances you should activate/deactivate.
- here you can see a quick sample route. After planning wit the Routing-Function, you can finetune the route using the Select Function and drag it around like on Google Maps.
If you want to switch between maps (this will only work if your have several maps installed) - make sure you got the MapSelector Tool in the Basecamp iconbar active, it is not active by default - here is how it looks - Globale Karte (third item from the left in the top list), you will have to get it from the toolbar menu with all items. I also recommend you to put the Routing-Function (here Routen-Funktion) from the very top right on the screenshot into your toolbuttons active all the time (I put it besides the map selector). You might also find the Track-Function very handy:
4. Step: Choose the layout of the Maps
The Openmtbmap currently comes with 6 different Map Layouts - unluckily this is not as easy to choose on Mac. But I tried to make the selection as easy as possible. Please read up which layout(s) best suit you here in the: Map Legend or on the Screenshots on Desktop or Screenshots from GPS
First - Open the installation folder. The place of installation you can find out with Garmin MapManager. It should be: /Users/YOUR_USERNAME/Library/Application Support/Garmin/Maps/mtbtaiwan.gmap (taiwan in our example, germany would be mtbgermany, and so on) - You can do so by Opening Garmin MapManager, and clicking onto "Show in Finder" (here Im Finder anzeigen)
Then rightclick on the map (in this case mtbtaiwan.gmap): and choose "Show Package Content" - it should the third entry. In German on the example here it is "Paketinhalt zeigen".
Now the Map Package will open (note, that in principle any map package is just a simple folder, but Garmin MapManager makes you see it as a so called package - with Finder alternatives like MuCommander you can just open the map package, without right-click):
Here you see how the Mapinstallation folder looks like. In the "Layout Files" section - the different map layouts are saved. Open the folder Layout Files, then choose the desired Layout folder (e.g. Classic_Layout), go into it, and copy the typXX.TYP file. Go up again to the main folder (mtbtaiwan.gmap) and just paste it in, overwriting the old (in this case) typtw.TYP.
Here is a quick overview about the folders inside Layout_Files:
a) Two folders to enable/disable showing the contourlines. "20m_contourlines" respectively "10m_contourlines" with an Info.xml inside to enable the contourlines and "Remove_Contourlines with an Info.xml to disable the contourlines in the map. Just copy/paste the Info.xml from here to the main folder, i.e. mtbtaiwan.gmap and overwrite the Info.xml in there. by default the 20m contourlines are active for all maps that have contourlines integrated and not in a separate download of course.
b) The map layout folders with a .TYP file inside.
- Classic_Layout (typical openmtbmap layout - optimized for high contrast and lots of information),
- Easy_Layout (easy openmtbmap layout for mtbiking - for those who prefer a cleaner easier to understand map compared to classic layout)
- Hiking_Layout,
- Thin_Layout (based on Classic but thinner lines),
- Wide_Layout (based on Classic but wider lines and streets)
- Dekstop_Layout - low contrast for working with Basecamp.
The Velomap has the following layouts right now:
- Dekstop_Layout - low contrast for working with Basecamp
- Velo_Layout (typical velomap layout - optimized for high contrast and lots of information),
- Race_Layout (high contrast for race cycling, only paved ways and streets are shown prominently)
So you copy the typXX.TYP and then paste it inot the main map folder - i.e mtbtaiwan.gmap, then you have the new layout activated. Note, you must no have Basecamp open at the same time, else the file is locked and cannot be overwritten!
Here I'm copying typtw.TYP from the Classic_Layout.
Now Going back up to "mtbtaiwan.gmap" (or mtbCOUNTRY.gmap) and pasting the .TYP
and finally confirming the overwriting - that's it. Once you've done it once, it's easy.
4b) Step: Delete Basecamp TileCache
If you change the layout of the map - and the map was shown before alreay - Basecamp will have cached it - so you cannot see the new layout (except by moving out of the area/zoom setting of the cache). To do So delete the contents of:
~/Library/Caches/com.garmin.BaseCamp/TileCache
(~ being your Home Folder).
You can do this from Terminal using the command /bin/rm -r ~/Library/Caches/com.garmin.BaseCamp/TileCache/*
it's also possible that the Tilecache is located here:
/bin/rm -r ~/Library/Containers/com.garmin.BaseCamp/Data/Library/Caches/com.garmin.BaseCamp/TileCache
or use:
/bin/rm -r ~/Library/Containers/BaseCamp/Data/Library/Caches/com.garmin.BaseCamp/TileCache
5. Step - Chose between 10m and 20m contourlines or no contourlines
Read through 4. Step on more detailled instructions how to open /Users/YOUR_USERNAME/Library/Application Support/Garmin/Maps/mtbCOUTNRY.gmap (taiwan in the example screenshot, germany would be mtbgermany, and so on)
Go into the Layout_Files folder and chose copy the info.xml that you find in the 10m_contourlines folder to /Users/YOUR_USERNAME/Library/Application Support/Garmin/Maps/mtbCOUNTRY.gmap if you want to activate the 10m contourlines. If you wan the 20m contourlines - you would copy the info.xml from the 20m_contourlines folder. And if you do not want to see contourlines - then copy the info.xml from Remove_contourlines folder to /Users/YOUR_USERNAME/Library/Application Support/Garmin/Maps/mtbCOUNTRY.gmap
Then if you opened the map before - look at 4b) Step: Delete Basecamp TileCache to delete the Tilecache.
6. Step: Send the Map to your GPS using Garmin MapInstall
NOTE: on Old GPS all maps have to be sent at once. And can then be activated/deactivated via Menu on your GPS. (old GPS e.g. Vista HCx, GpsMaps 60 CSx). On new generation GPS (e.g. Dakota, Oregon, edge 800, GpsMaps 62, Montana), you can send the maps one at a time as you like.
Make sure you connected your Garmin, or put the memory card into a cardreader on your Mac (that is what I recommend on older devices - as they have very slow USB 1.1 connection so sending maps takes a long time). If not it will look like this - with the selector empty so you cannot continue:
First a note - The SD-card needs to be formatted FAT32 with Master Boot Record:
Now that everything is ready - here we go - open Garmin Mapinstall (you can find it in Basecamp on the bottom of the Maps Menu - or open it from your app drawer)
or you can open Mapinstall it by right clicking on the memory card of the connected device - and then "Install Maps on ...":
Watch out on Advanced/Partial Install of Maps:
We choose the region not by left clicking into it, but by dragging the mouse over the region we want - while holding the left mouse button (else you miss the contourlines)!
I selected a second map, by choosing another map on the MapSelector in the image above, and also choosing the region I want. Note that you shouldn't overload your GPS device with maps. I recommend max 2GB for old Garmin GPS, and 4-6 GB of Maps maximum for new generation Garmin GPS devices. Note also there is a limit of 2048 or 4096 maptiles depending on your GPS device. If you put too many maps onto it, then starting the device will be slow, and using the search function will be slow too.
Then I click on "Send Maps" (Karten senden) and MapInstall asks for Confirmation - showing me what will be installed - which we confirm again:
And we can go and have a coffe while the maps are sent (depends on the size of the map, how long it takes). Especially on older GPS - best send the maps to the micro-SD Card that you use with it, and put that micro-SD Card into a cardreader on your Mac, so it sends much faster (old Garmin GPS units only have USB 1.1)
More Detailed instructions on sending maps can be found here:
Send Maps with MapInstall to Device
General information about he Openmtbmaps and using them
Using the maps on your GPS
Please read through the following three topics:
howto-setup-your-gps/ and autorouting/
and https://openmtbmap.org/about-2/plan-routes/
Participate in Openstreetmap and help to make the maps better:
The Openmtbmaps are based on Openstreetmap, hence you can help to improve the map data!
Activating 2d view in Basecamp:
The 3D view is confusing to many users, and slower than the 2D view - I advise you to switch to 2D view in general using Basecamp:
Note - several users have reported that Basecamp under mac OSx Big Sur (or newer) runs very sluggish in 2d mode. The solution to this is to run it in 3d mode - but set the 3d mode to 0% elevation gain - making it identical to the 2d view.
hola
he instalado el mapa España en BaseCamp en un MacOs con Sonoma 14.4.1
he seguido las indicaciones copiando y pegando el archivo Info.xlm pero no se activan las 20m_contourlines
puedes indicarme que más puedo hacer?
gracias
The best way to check is to install another map with contourlines integrated, e.g. Portugal and check the file structure. It needs to be identical – 6* and 7* folders in the right place as well as the info.xml. Then delete the Basecamp cache because now you have cached images of the map without contourlines.
Hi Felix,
Thank you by your answer
I have downloaded the Spain contour line compressed file but it doesn’t contains the 7* 6* files (you can check it)
So I can’t install
Could you indicate where find this files?
Thanks
The mac osx spain contourlines download – after unpacking – contains loads of 7* folders (meaning folders starting with 7) – it’s those that you have to copy as under step 2ab) in the instructions. Look at the pictures of the instruction – once you understand it it’s pretty easy.
hi felix,
I’m asking for your help now:
I know very well the procedure for downloading the separate contourlines because I do it very often. I put the contourlines (mtbmap-cntrs20m-central-america.gmap – folders 7*) in mtbcentral-america.gmap (in Product1 folder).
Unfortunately the contuorlines are not visible in basecamp nor in garmin Montana.
Do you already have some feedback for this issue?
thank you very much for your irreplaceable support
max
Hi Max,are you sure you replaced the info.xml as well? Can you check the size of the gmapsupp.img – is it as big that it includes the 7*.img files or rather it’s only 6′.img files?
I’m pretty sure if you cannot see the contourlines in Basecamp – then the countourlines haven’t been sent either. ( a quick solution for the montana would be to download the contourlines gmapsupp.img file additionally – but that will not fix your issue in Basecamp and needs to be removed before you send the map with contourlines included from Basecamp next time).
Hi! I just registered and I can’t seem to upload the maps to my Garmin Forerunner 955, because BaceCamp and MapInstall won’t recognize it. Garmin Express works flawlessly. I deleted Andoid file transfer too. I’m using Big Sur 11.5.2.
How can I install the “fenix” version of the maps if I can’t use the MapInstall?
Jaakko
Hi Jaakko, to change the layout on Mac OSx there is no way around doing it with MapInstall. If MapInstall does not see the Forerunner 955, you can first send to an external drive/ SD card then copy the gmapsupp.img file from there directly into the /garmin folder of the 955. And yes – on 64 bit displays you really want the Fenix layout.
Okey, thank you! I’m just wonderin… the map file is .gmapi-file. Did I miss something? I can’t do anything on Mapsinstall since it wond recognize FR955. I can open the map on BaseCamp though, but BaseCamp doesn’t recognize FR955 either.
MapInstall will recognize any external drive as destination!
then later you move the gmapsupp.img file to the FR955
Thank you, it worked when I installed into my SD-card. I just can’t seem to see the map on my FR955, even though I copied the gmapsupp.img straight to Garmin folder? I swear, this is my last question! 😀
you may need to activate the map first in the map setup menu. If the other (preinstalled) maps on the 955 are in the same location it is correct. I would assume the 955 is identical to Fenix 6/7 in this regard. But yes it’s a bit strange Mapinstall/Basecamp does not recognize the 955. Maybe the 955 has no full map support? Try to find out how the pre installed maps are stored and activated/deactivated.
PS.: Noch ein Problem, das ich noch nie hatte:
Ich übertrage die Karten auf die SD, benenne die gmapsupp.img um in Land_xy.img, übertrage eine weitere Karte, nun ist meine Land_xy.img mit einer neuen gmapsupp.img überschrieben.
Werner
Wenn es Ausschnitte aus derselben Karte sind – ist MapInstall korrekt beim löschen – wenn nicht dann blöd. Du kannst sie etwa .img.bak bennenen -oder verschieben – und zurück verschieben. Dann sieht MapInstall sie nicht (aber bitte nicht aus selber Karte – doppelte Kacheln am Gerät können zu Problemen führen).
Komisch, weil Alps und Norway sich nicht die selben Kacheln haben. Aber temporäres auslagern funktioniert immerhin. danke
Servus Felix,
bei den Höhenlinien (Norwegen, Schweden) hab ich das Problem, dass ich im entpackten Ordner nur eine .gmapi und eine .txt statt 7* Ordner vorfinde. Wo ist das Problem?
Danke, Werner
Die Gmapi ist um installieren als einzelne Karte – öffne den Gmapi Ordner per Rechtsklick und du siehst die 7* Ordner.
Merci, die Ordner sind zwar sogar noch eine Ebene tiefer, aber es funktioniert.
Hi There,
I’ve download the omtb_italy map on my BaseCamp (MacOS Mojaie) It seems fine.but when I’ve tryed to upload parts of the map on the SD-Card something went wrong!
I can see this file omtb_italy.img in the folder but I can’t open it and, the follow message appears: “No mountable file sistem”
Can you please help me
Many thanks
Giorgio
Hi Giorgio, you cannot open .img files – the Garmin GPS device opens them. You should read through all tutorials here on the site, plus best watch also all the vidoes to get an understanding of the way Garmin devices work.
Hi Extremecarver,
thank you for your reply.
I will watch the video and see if I can do it.
ciao, ho scaricato la mtbeurope ma quando estraggo con unarchive mi crea la cartella gmapi con all’interno il file gmap. Non riesco ad andare avanti. Ho un M1.
You need to look at step 2a and 2ab in the osx tutorial. For Europe Map it’s two downloads (three with contours) and you need to move them by hand.
Hello.
I just installed the contourlines for the Morroco map an it was very easy indeed.
I’m using a MacBook.
Then I did the same procedure with an American map and it didn’t work.
It’s the us_west if you can take a look and give me some thoughts of what I might be doing wrong.
Tks.
Well the US west has the contourlines as a separate download. So check step 2a) in the tutorial if you wanted to add the contourlines (and exchanged the info.xml). But the same applies to the Morocco map too. Check the structure of the folder Morocco vs US West – I guess you exchanged the info.xml but did not correctly move the contourlines. Or you chose another download like the 10m contourlines instead of the 20m ones.
Hallo Felix, dieses Mal brauche ich deine Hilfe.
Sie neue Unicode Karte ist installiert und wird auch in BaseCamp 4.8.11 german angezeigt, allerdings ohne Höhenlinien.
– mtbeurope.gmap nach /Users/YOUR_USERNAME/Library/Application Support/Garmin/Maps/ kopiert
– Alle 6* und 7* Ordner nach Product1 kopiert
– typeu.typ aus Thin_layout zwei Ebenen oberhalb ersetzt
– info.xml aus Integrate_Contourlines zwei Ebenen oberhalb ersetzt
– ~/Library/Containers/com.garmin.BaseCamp/Data/Library/Caches/com.garmin.BaseCamp/TileCache geleert
BaseCamp öffnet die neue Karte (20.03.2021) ohne Höhenlinien
Ich habe für das gpsmap62 Thin als Layout gewählt
Was hab ich falsch gemacht oder vergessen?
Danke
Sind es die neuesten Höhenlinien? Ich habe diese vor gut einer Woche aktualisiert. Weit genug hereingezoomt?
Beides ja, download von gestern und bis zur höchsten Zoomstufe
P.S.: Zoomstufe natürlich in den Alpen und nicht im Marschland an der Nordsee 🙂
Überprüfe noch einmal ob du wirklich alles richtig verschoben hast – und schau dir die Stuktur einer einfachen Länderkarte wie Deutschland im Vergleich an…
Wenn ich nicht schon drei Mal kontrolliert hätte. Also soll ich testweise zb die Österreich Karte installieren, weil da die Höhenlinien integriert sind?
probiere mal eine Länderkarte ob du da die Höhenlinien siehst – und dann vergleich die Ordnerstruktur – irgendwie hast du einfach glaube ich einen Fehler gemacht. Bzw wechsel mal das Profil / Routingmodus in Basecamp. Man kann theoretisch die Höhenlinien abschalten in den Optionen…
Sehr suspekt. In der D-Land Karte sind die Höhen drin. Eine Profiländerung bringt keine Besserung. Die Ordnerstruktur ist exakt gleich, nur ist in der mtbeurope.gmap eine unicode.txt, was egal ist. Also alles nochmal von vorne:
– Neuer Download und entpacken der contour und der .gmapi (Falls da was schief ging)
– .gmap aus dem Paket nach …/Garmin/Maps kopiert
– alle 7* nach Product1 kopiert (die Kartendaten noch nicht)
– dann zum Test die info.xml aus Contourlines_Only zwei Ebenen höher ersetzt
– BaseCamp öffnen und eine leere “Karte” OHNE Höhenlinien bekommen
In der D-Land Karte bekomme ich hiermit eine “Karte” in der nur die Höhenlinien und Koten angezeigt werden, in der Euro-Karte nix.
Jetzt bin ich gespannt, was dir dazu einfällt
Ich hab keine Idee
Oh sorry – großer Fehler meinerseits. Aber verwunderlich dass es bisher nur dir aufgefallen ist. Ich hatte die Europa Höhenlinien für OSx in der neuesten Version noch gar nicht hochgeladen. Hab das gerade korrigiert. Bitte lade die Höhenlinien noch einmal neu herunter (jetzt Version 17.03.2021) – dann sollte alles funktionieren.
Super, danke, es funzt!
Schöne Feiertage und frohe Ostern.
Werner
Hallo, ich versuche die Map auf meine Garmin Fenix 6s Pro zu laden. Bei der “Nicht Unicode” Karte erhalte ich beim Hochladen eine Fehlermeldung und bei der “Unicode” Karte kann ich diese auf dem Gerät nicht aktivieren. Sie steht nicht zur Auswahl.
Hast du eine Idee, woran das liegen könnte? Oder welche Karte ich verwenden muss für die Fenix 6s Pro?
Vielen Dank und Gruss
Yvonne
Hallo Yvonne, um welche Karte genau geht es denn?
Und ja eine Unicode Karte geht definitiv nicht – du brauchst die Non Unicode Version. Und welche Fehlermeldung beim senden? Evtl installiere die Karte (also non Unicode) mal neu – inklusive neu herunterladen.
Hi
I downloaded from the Mac OS session, followed the procedure with the unarchiver but it doesn’t create the gmap file to install the map on Mac, it just creates a folder with all the files, what can I do? thanks
That is on the Europe map – you need to download the gmapi separately – it’s two downloads (three with contourlines) – it’s step 2ab) in the Tutorial.
i solved thanks
Hi, I’m trying to install only the Italy download and not the europe ful